WebVM is a virtual Linux environment running fully client-side in the browser.
It is based on CheerpX: our WebAssembly-powered x86 virtualization technology. Thanks to a powerful JIT recompilation engine, and an ext2 block-based filesystem, it makes it possible to run large-scale use cases: GCC / Clang / Python / Node.js / Ruby and many other things are supported out-of-the-box.
But something important was missing: networking.
Networking is the most requested feature of WebVM, and for good reasons: without it, you can only input and output data via the terminal, and you are limited to use what we included in the OS image.
The main difficulty in adding this feature is that the browser does not expose access to lower-level protocols such as UDP and TCP. You can only do HTTP(S), and even then, you are severely limited by CORS policies.
What about WebSockets then? A WebSocket connection starts with an HTTP connection with an “Upgrade” header. Then, if the upgrade is accepted, the WebSocket protocol takes over. WebSocket packets also have their own header. So they can’t be used transparently to connect to regular TCP sockets.
In order to connect to arbitrary sockets, we need a proxy server to perform the protocol upgrade and unwrap the WebSocket packets before sending them to the destination (and do the opposite in the other direction).
Hosting this proxy server spawns a new set of problems:
- We need to pay for and maintain a piece of server-side infrastructure, which needs to scale with the number of users.
- Since our server performs the network requests on behalf of the users, we would become legally responsible for the traffic. The service could be abused by malicious actors.
To solve the second issue we would need to require users to authenticate, keep track of their network usage, and effectively become a VPN provider.
What if we could offload this “VPN provider” business to someone more qualified, then?
If we could find a VPN service that can be used directly from the browser, we could even eliminate the first issue, and avoid the need to host any server infrastructure ourselves.
Meet Tailscale
Tailscale is a VPN service based on the WireGuard protocol. It includes a control plane that manages the WireGuard keys of all the machines in the network and takes care of authenticating users.
Since it’s built on top of WireGuard, and WireGuard uses UDP for communication, you would think that we are back to square one.
One of the features of Tailscale, though, is the ability to let machines connect with each other directly in a mesh network. It achieves this by providing STUN servers for NAT traversal.
Sometimes even the STUN server can’t punch through the NAT, so as a fallback mechanism, Tailscale provides DERP servers.
A DERP (Detoured Encrypted Routing Protocol ) server is used to relay traffic when two peers cannot connect directly. Since it’s designed to circumvent even the most annoying firewalls, it communicates using regular HTTPS and Websockets.
That’s exactly what we need!
Now we just need to reimplement the Tailscale control plane protocol, the DERP protocol, and the WireGuard protocol in the browser, and we are set.
Just kidding! Luckily for us, the official Tailscale client (written in Go) compiles to Wasm.
By slightly modifying their browser ssh client (tsconnect), and implementing a custom Tun device, we successfully communicated with a Tailscale network by just sending/receiving IP packets on a JavaScript MessageChannel!
About Go and Wasm
I was pleasantly surprised by how easy it is to compile Go code to Wasm.
You just need to set the environmental variables GOOS=js GOARCH=wasm, and ship $(go env GOROOT)/misc/wasm/wasm_exec.js alongside the wasm module.
Of course, your dependencies need to support the wasm target (and in my case, the folks at Tailscale did all the work).
One downside is the size of the compiled wasm module: 16MB!
Wasm-opt didn’t help much either: it shaved just 1MB. For comparison, the whole CheerpX VM fits under 6MB.
For this reason, the networking code is lazily loaded only if you attempt to log in to Tailscale.
TCP/IP Stack
With surprisingly little work, we can now exchange IP packets from a Browser. Unfortunately, most applications don’t send raw IP packets but use TCP or UDP to communicate.
We could build a TCP/IP stack from scratch, but hopefully we can find an existing one.
Lwip (written in C) seems to be a common choice in the embedded world. It was pretty easy to compile it to Wasm with Cheerp, and to add a “driver” for our MessageChannel network interface.
The only missing part is to implement a bunch of network-related syscalls in CheerpX using lwip, and we are good to go.
Demos
Enough with the theory, what can we do with this thing?
SSH
The most straightforward use of a network-enabled WebVM is to use it as an ssh client:
You can access other machines in your Tailscale network (and beyond, if you have an exit node) from any browser, in a privacy-preserving way. Your keystrokes are not only encrypted, but they don’t touch our servers at all.

You can also use ssh to easily move files in and out of WebVM. This increases the scope of what you can practically do in WebVM, since you can now import code/data to execute, and export the result of your work.

Full stack web development
A more ambitious goal is to use WebVM as a full-stack development platform.
Admittedly, we are not really there yet, but networking is an important step towards that goal.
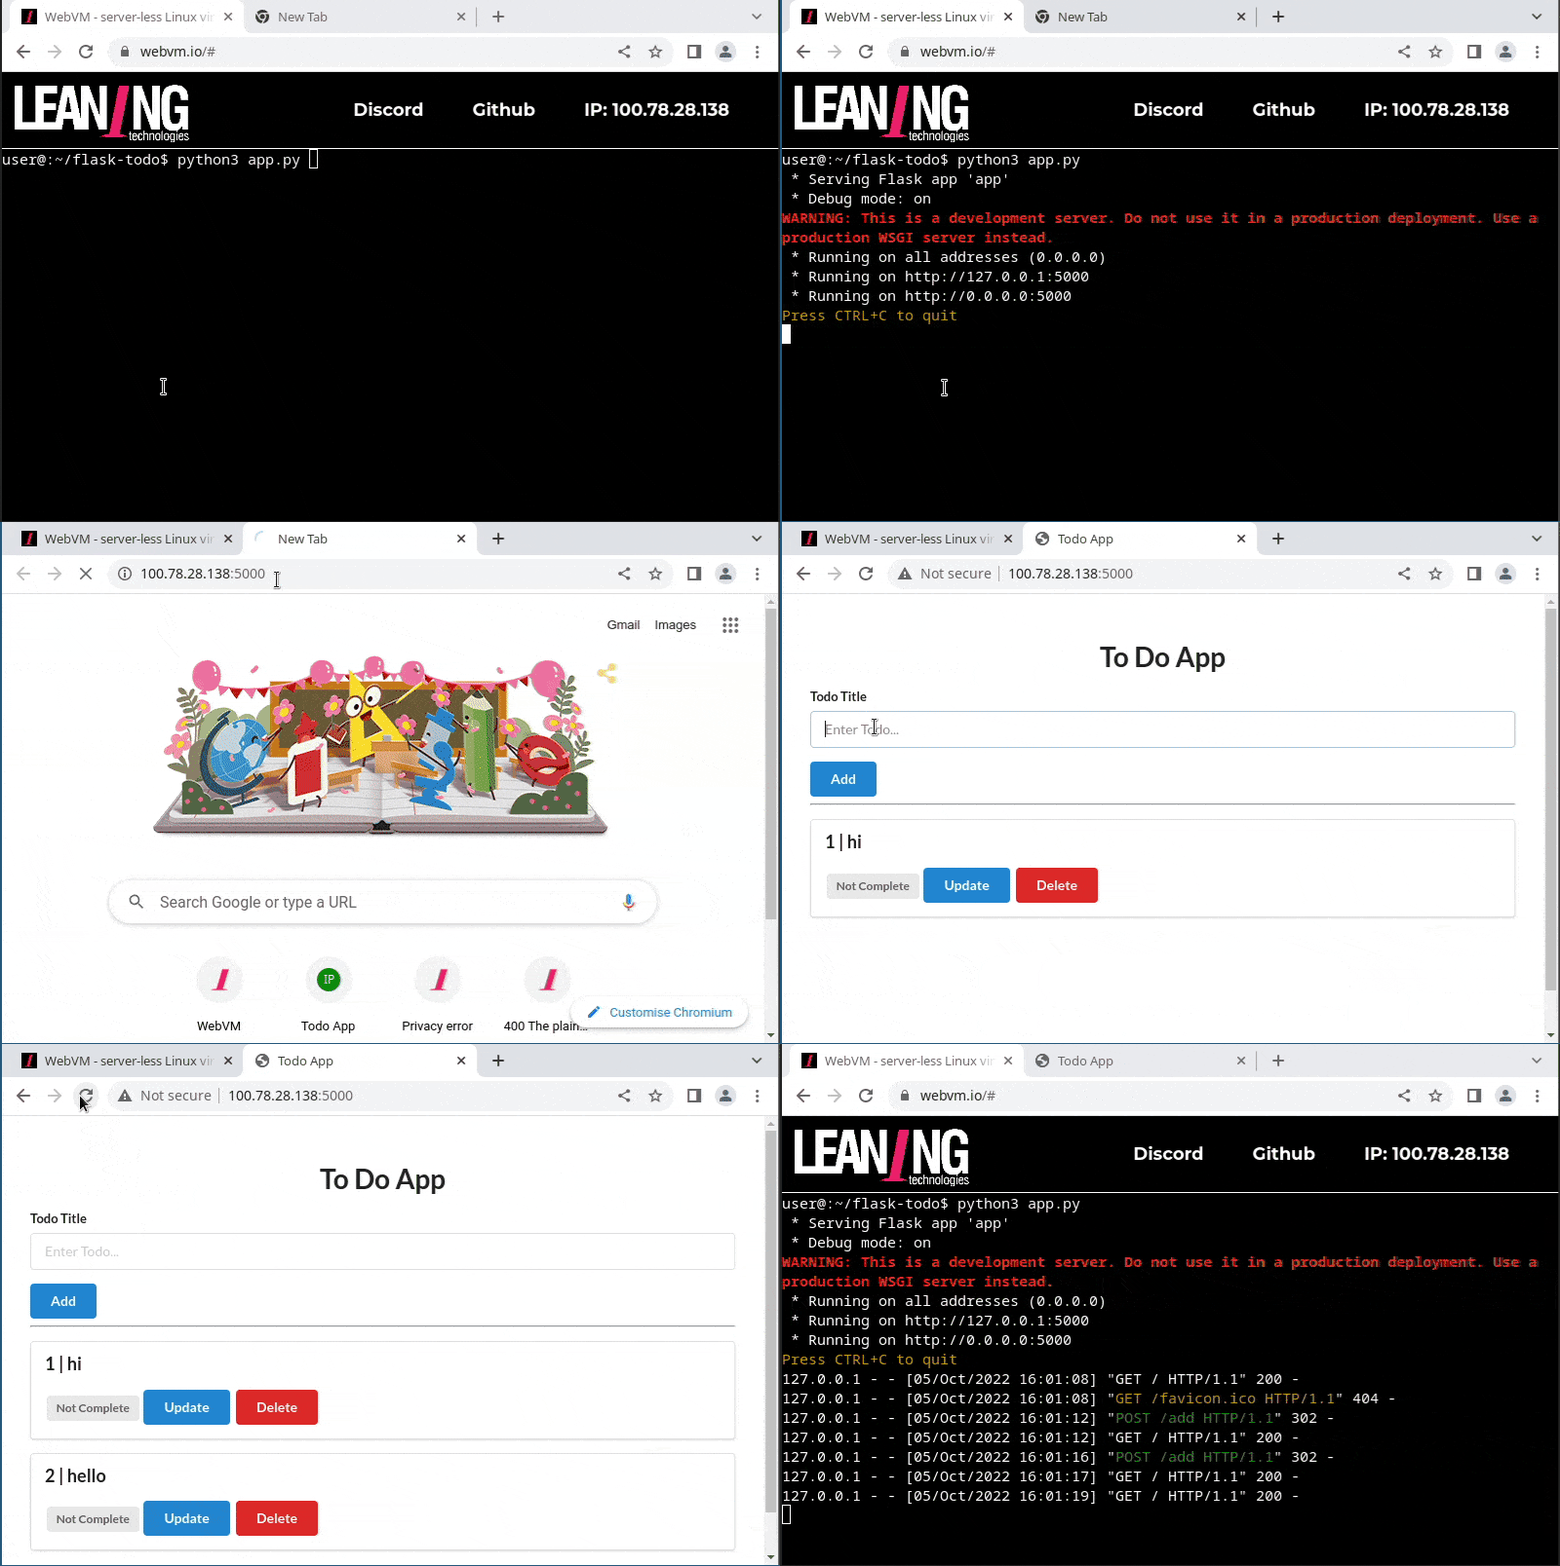
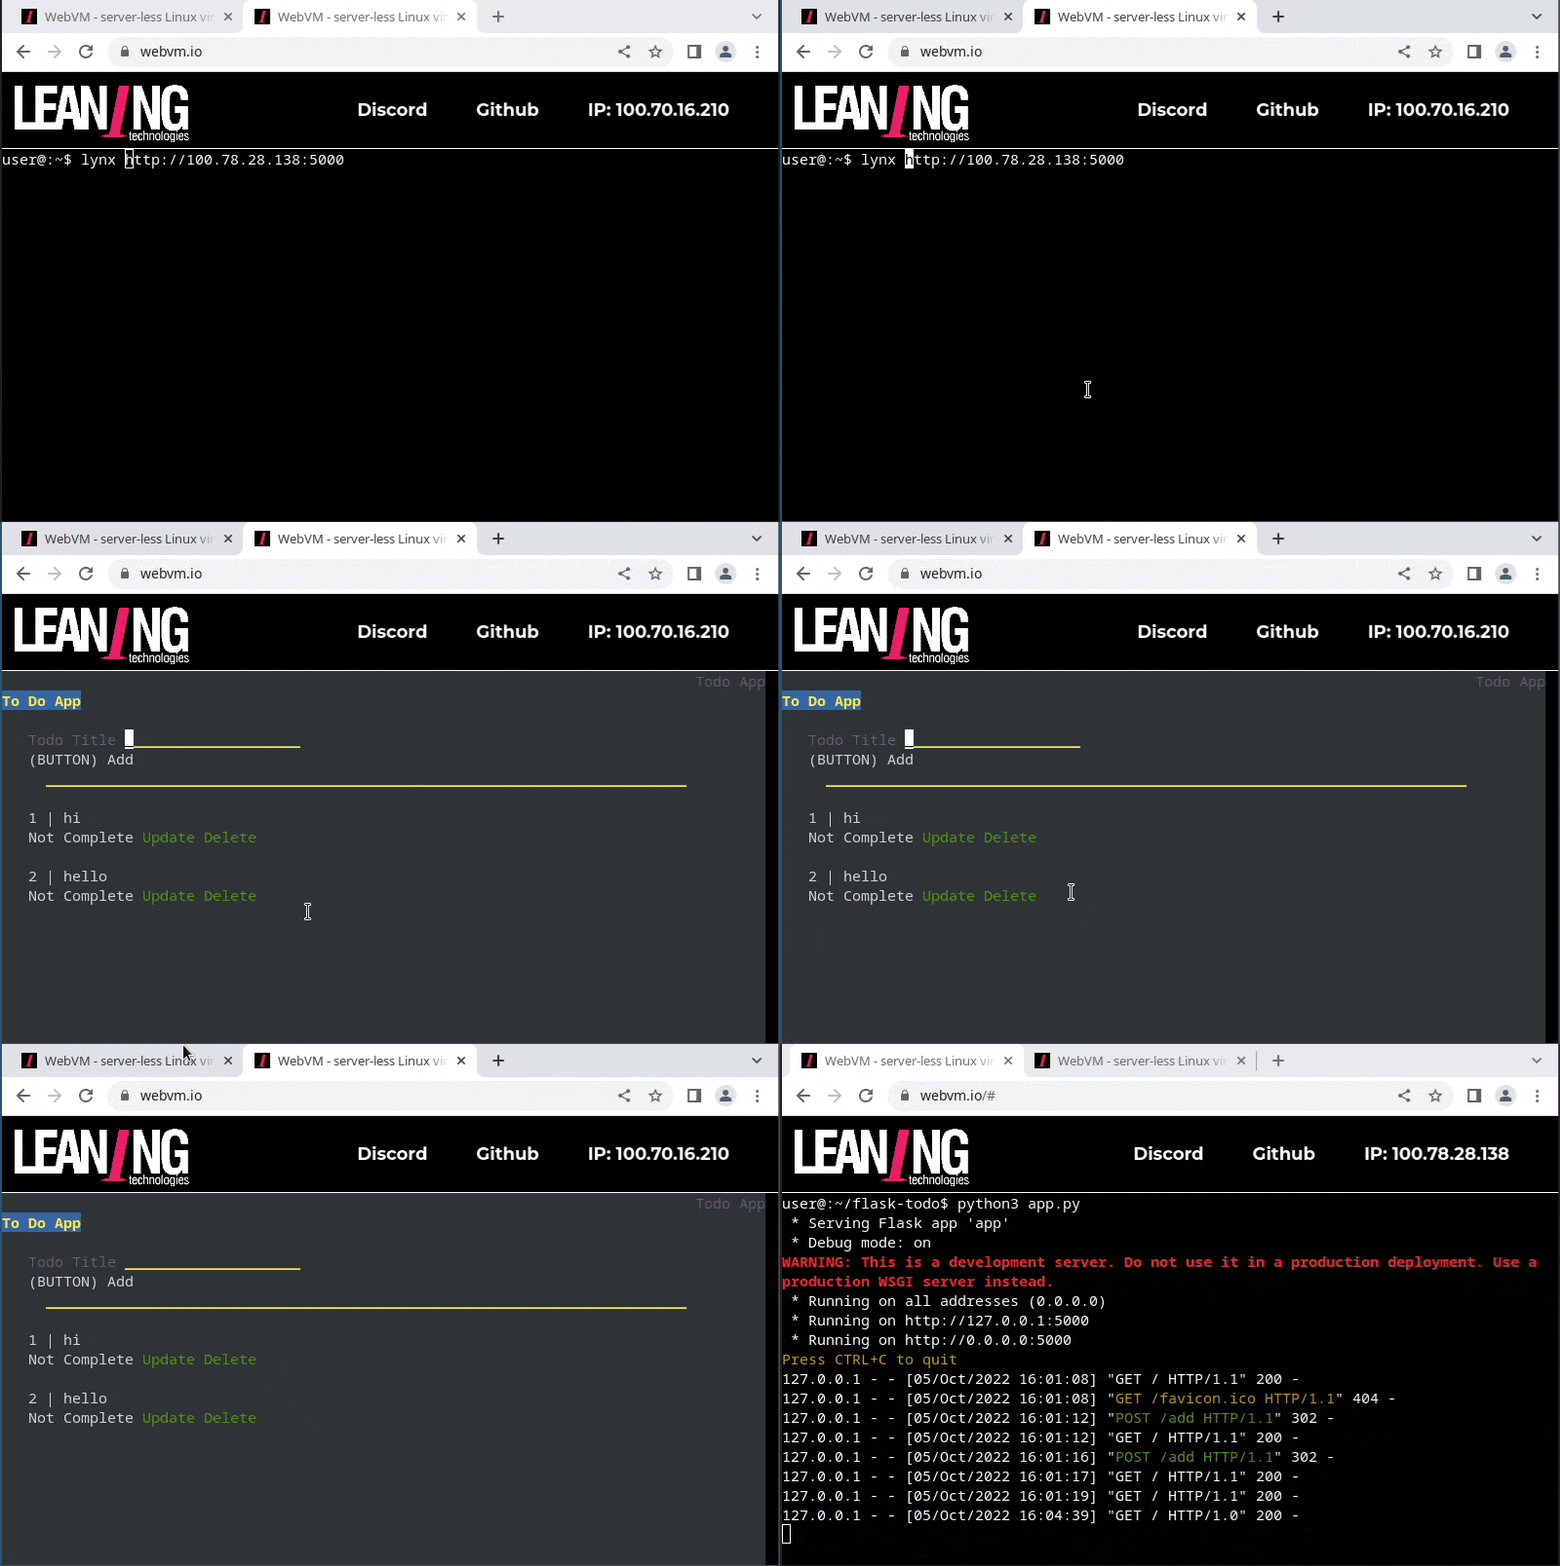
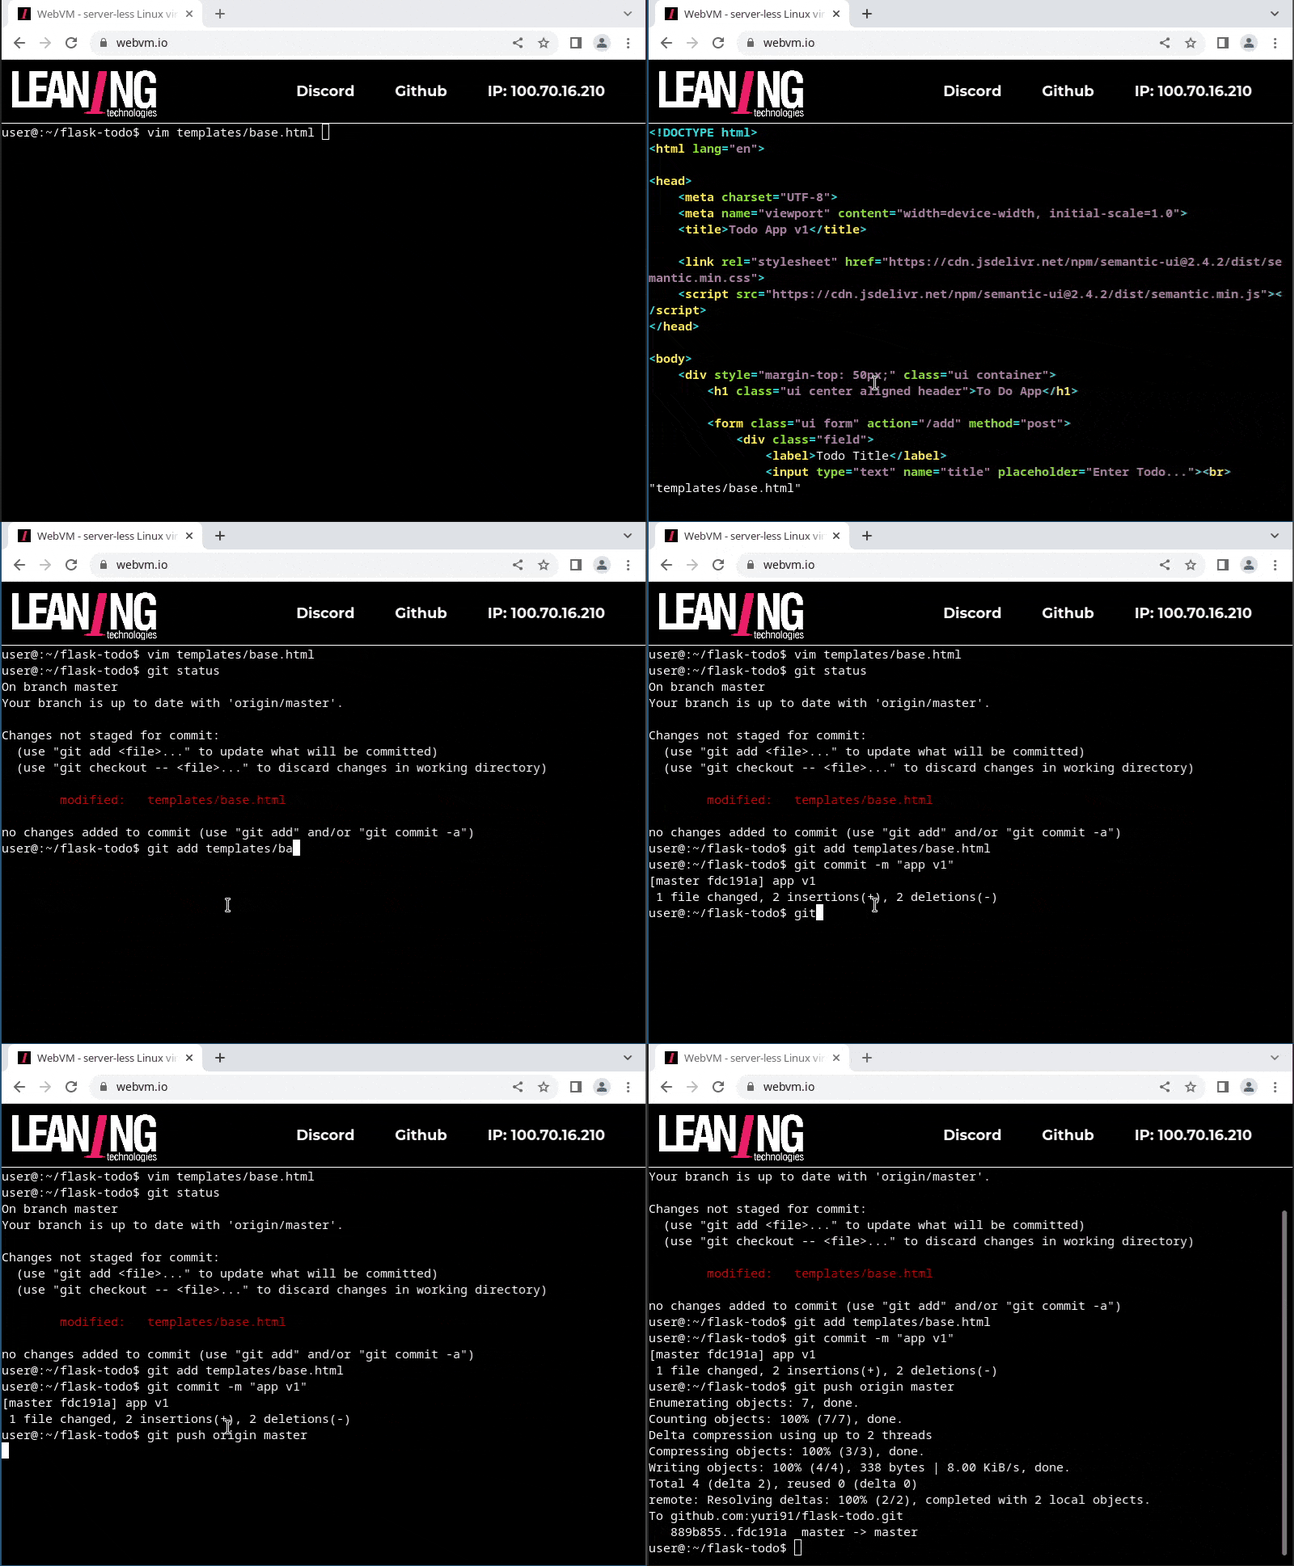
In the next demo gifs, you can see me:
- downloading a Python git repository from github.com

- installing dependencies with pip

- running a Flask web application that includes an Sqlite database for persistent storage, and access it from a second browser tab

- access it from another WebVM tab, with
lynx

- edit the application, commit to git, and push back to github

It is certainly not fast to install the pip dependencies (some setup scripts are compiling native code there!), but thanks to our IndexedDB-backed filesystem, you only need to do that once.
And there are of course many more limitations. For example, npm is not working yet, nor is apt. But none of these issues is particularly complex to solve, and our syscall emulation layer is constantly improving (thanks also to the expanded set of applications that we can run with network support).
Try it yourself
If you want to give it a try yourself, here are the steps to enable network access in WebVM:
- Go to webvm.io and click “Tailscale Login” in the top right.
- Depending on your network speed, you may need to wait a few moments for the Tailscale Wasm module to be downloaded.
- Log in with your Tailscale credentials.
- If you want to access the public internet, you need an Exit Node. See here for how to set one up. If you just want to access a machine in your Tailscale Network, you don’t need it.
- Go back to the WebVM tab. You will see your IP address in the top right.
- Start firing network requests!

Given the short-lived nature of WebVM, we log into Tailscale as an Ephemeral Node. This means that the node will disappear from your Tailscale Network after a period of inactivity. It also means that when you reload the tab, you need to log in again. It should be faster the second time.
What’s next?
We are very excited about the possibilities that network support unlocks for WebVM.
And while we have ideas on what to do next (hint: X11), we are also curious to hear about what your would like to use WebVM for.
You can get in touch by email or on Twitter, or have a chat on our Discord channel.
If you try something and it doesn’t work, feel free to open an issue on GitHub.
Discussion on Reddit: https://www.reddit.com/r/programming/comments/xx3r83/webvm_linux_virtualization_in_webassembly_with/
Discussion on Hacker News: https://news.ycombinator.com/item?id=33116245


